Ages ago I posted on my Instagram that I had constructed my own photography light box, and the darling Meg from A Dash of Meg included me in one of her High Five Friday posts! And then I dropped off the face of the blogosphere. However, back on track, here is the tutorial!
For a while I thought that I was the only food blogger who actually cooked in the evening, and I was a bit jealous of everyone else’s gorgeously lit photographs. However, while browsing the Google+ Food Bloggers Community, I came across this do it yourself light box tutorial. Apparently, food bloggers cheat Mother Nature and create their own daylight, * lightbulb * (pun intended.)
The tutorial gives a shopping list and a few instructions, but when it comes to math and technical building, I happen to be the type of person that needs step-by-step instructions and exact measurements. So, I called in the cavalry, aka my ever-so-handy father (thus the very large and very not-female hands in a few of the photos.) We followed the original tutorial’s general instructions, but used our own dimensions, and changed a few things that I thought would make life a bit easier!
What You’ll Need:
2 Foam Core Boards 20x30x 3/16 inches
2 Daylight Lightbulbs (mine were 1600 lumens/23 Watts)
Light Socket Y-Splitter
Lamp Cord Set with Pull Chain*
White Cross Stitching Screen
Self Adhesive Velcro Circles*
Hot Glue Gun
Yardstick
Razor Knife
*Different than original tutorial
Instructions:
1. Cut two 10”by 20” pieces of foam core board. These will make up the top and the bottom of your light box.
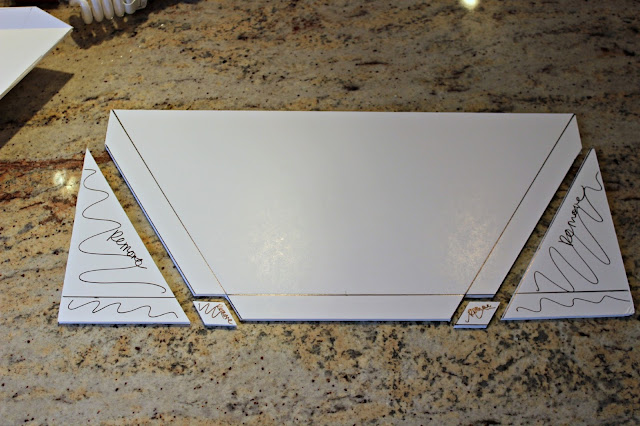
2. Trace the lines that will create the flaps that secure the box together using a ruler and a pencil (we used a black Sharpie so it would be easier to see in pictures).
- a. Start with tracing a line one inch above the bottom edge.
- b. Make a mark at inch 5.5 and inch 14.5 of the line you just traced.
- c. Use the ruler to trace a line from each upper-outer corner to the marks made at inches 5.5 and 14.5 (Left outer corner to inch 5.5 and right outer corner to inch 14.5) this will leave a nine-inch flap in the center of your board.
- d. Place the flat edge of the ruler on the diagonal line from each outer corner to the 5.5 and 14.5 inch marks. Trace the opposite edge to form a parallel line one inch thick. These will be the side flaps.
- e. Cut out the excess board (please see pictures for which parts are excess- they are marked by black squiggly lines)
- f. Do steps a-e twice to form the top and the bottom pieces of your light box.
3. Score (cut but not all the way through) the long traced lines of the flaps so that they easily bend in the opposite direction. This is how you will secure the flaps to the sides of the lightbox.
4. Cut three pieces of foam board to create the side pieces. The dimensions of the pieces are (2) 10.5”x20” and (1) 9”x20”
5. Flip one of the base pieces (with the scored flaps) upside down so that the flaps fold upward.
6. Situate the 9”x 20” side piece in the center of the base. The center flap of the base should fold up and fit snugly with the side piece. Using a hot glue gun add glue to the flap, fold up, and use pressure to secure the flap to the sidepiece. Make sure to wait until the glue has set. Side one finished!
7. Using the same process attach the two 10.5” x 20” side pieces to each additional flap on the base.
8. Use a line of hot glue to secure the long lines of the side pieces to one another, creating a single board.
9. Create the top of the box by using the same method of gluing the flaps onto the sides with the remaining 10”x20” cut board. Make sure that the flaps are facing down towards the box so you can glue them to the sides.
10. Voila- a box! Now onto lighting.
11. Center a pencil dot 6” up from the bottom of the box. This will be the point where your lighting fixture will be installed.
12. Trace around the inside of the retainer ring to create a circle template for you to cut.
13. Cut out the circle you just drew. This is a pain. Be very careful with the razor blade!
14. You should be able to actually screw the light fixture into this hole. However, if the fit is not snug it is not a big deal, the retaining ring will hold it in place.
15. Screw the retaining ring into place. Make sure that it is only finger-tight, you do not want to bend the foam board.
16. Screw the Y splitter into your light fixture and add lightbulbs.
17. Cut a piece of the cross-stitching screen to fit across the front of your lightbox making sure to leave an inch or two on either side for fastening.
18. Using the self-adhesive Velcro circles, affix three to each side of the box for a total of six.
19. Remove the backing and press the cross stitching screen onto each Velcro dot making sure to pull the screen snug across the face of the box. When the adhesive is set, you can remove the screen at will to change the lightbulbs!
20. Plug your lightbox in, pull the chain to turn on the lights and you are ready to go!
I know this was long and involved, but it is so worth it! I took a picture of the exact same strawberries at dusk with and without the lightbox turned on. It makes such a difference!


